Webinar: Deep Sea Animal Adaptations Week – Deep Sea Fishes and Sketching
Aired July 15, 2020
Lara Noren:
Hello, everybody, and welcome. Hi, everybody. Thank you so much for joining us today. Hello, Raj. Hello, Finn. Hello, Christopher. Thank you so much for joining. Hi, Oscar. Hi, Jill. Hey, Garrison. Hi, Brock. Thank you so much for joining us. Hello, Morgan. Hello, Olivia. Hello, Ariel or Ariel. Hello, Charlotte. Hello, Alberto. Thank you so much for joining us, everybody. My name is Lara, and I am going to be talking with you today and the rest of this week about deep sea adaptations, so welcome. Oh, thank you, Jack, for saying hello. Hi, Chloe. Hi, Sarah. Hey, Kevin. Hi, everybody. Thanks for joining.
So as I said before, my name is Lara, and I am a museum educator at the National Museum of Natural History in Washington, D.C., and welcome back to those of you who were here yesterday or earlier this week. So far we have doodled the deep sea, made jellyfish puppets, and today we are drawing fish with some really cool ocean experts. And for our new explorers, we are so happy that you have joined us today. So for today's activity, you are going to need a piece of paper. I have mine right here, and a pencil or a pen. And I'm going to go over a couple of details to allow everyone to get time to grab those materials.
So before we begin, I want to give a special thanks to our generous donors, volunteers, and other important partners who enable us to discover, create, and share new knowledge with the world today and every day free of charge. Thank you. So some of you might already know that I love the deep ocean, and my favorite deep ocean habitat is a hydrothermal vent, and to get us started thinking about the deep ocean today, I'm really curious to talk about fish with all of you. So my favorite fish is the grouper, because I think they are super friendly and fun, and I also think they're really cute. So let me know what is your favorite fish, or do you know any names of any fish? You can let me know in the Q and A, and you can do that by using the Q and A button at the bottom of your screen, the one with the double speech bubbles.
All right. It looks like we have some responses coming in. What is everybody's favorite fish, or do you know a name of any fish? Okay, sharks. Yes, I totally love that answer. A lot of people don't know that sharks are fish, so that is awesome, very cool. Goliath grouper, same. Goliath grouper are so cool. I love their googly eyes. Angler fish, oh, awesome, like we drew on Monday. That is awesome. Sturgeon, catfish, well, very cool. So while you tell us the names of the fish that you know, I want to remind you that we have some awesome people who are answering some of the many questions that you'll be sharing with us today, and I want to thank you all for writing your questions and comments during the last two programs.
We received so many questions and comments yesterday. We received over 2,000, so thank you all so much for writing in. And even if we are not able to respond to your questions and comments, we still love to hear from you. Now, let's meet the four people that are responding to all of those questions and comments. Welcome, Will, Ashley, Odalys, and Juan Pablo. Hey, everybody.
Ashley:
Hello.
Will:
Hello.
Lara Noren:
So thank you all for joining us, and what is your favorite fish, or what fish do you know about?
Will:
Hey, everyone, it's Will. My favorite fish is the archer fish, which is actually behind me, because they shoot out little jets of water to get insects and eat them, so they're really cool to me.
Lara Noren:
That is really cool.
Ashley:
Hi, guys. My favorite fish is the pufferfish just because I like the fact that it blows up like a balloon. I just think it's so cute.
Lara Noren:
Awesome.
Odalys:
Hi, everyone. My favorite fish is this baby right here, the blobfish. I just think it's so cute
Juan Pablo:
Hey, everybody. One of my favorite fish would be the tigerfish. I love those, beautiful.
Lara Noren:
Awesome. Well, thank you all so much for sharing your favorite fish. Now I will let you all get back to responding to our explorers. And I'm going to read a couple more of everybody that has submitted. So we've got pufferfish, clownfish, catfish, Nemo, Mola mola, awesome, ocean sunfish, very cool, ooh, whale sharks, orcas, salmon. You guys know a lot of fish. That's awesome. So we emailed some information to your parents and caregivers, but we wanted to quickly cover a couple more boring but important details before we start today's activity. So this webinar will run for an hour, and again, you need a piece of paper and a pencil if you don't have it yet. And after the program, you can go to our website and find a dive deeper at home activity and activities from the previous day, and you can submit your work each day and reach us at any time by email at youthnmnh@si.edu, and we'll be displaying that information today after the program as a reminder.
So let's get started talking about what we are going to be talking about today. So as you can see here on your screen that we are going to be talking about deep sea fish and sketching, and we have some really exciting and interesting experts that are going to be joining us today, and we're going to be learning actually how to make a scientific illustration. So let's get started. Welcome to Rachel and Kate.
Kate Bemis:
Hi, everyone.
Rachel Keeffe:
Hello.
Lara Noren:
Hey there.
Kate Bemis:
So I am a scientist at the NOAA National Systematics Lab, which is located in the National Museum of Natural History, and I'm an ichthyologist, which means that I study fishes, and I'm interested in all kinds of things about fishes, but in particular I'm really interested in fish anatomy, and how we can use fish anatomy to distinguish and identify species. Yeah, that's me.
Lara Noren:
Well, thank you so much for joining us today, Kate. Rachel, do you want to tell us a little bit about yourself?
Rachel Keeffe:
Sure. So my name is Rachel Keeffe. I'm a Ph.D. student at the University of Florida, and I'm a herpetologist, so I mostly study amphibians and reptiles, and my favorite group to study are frogs, but I also love fishes, and I also do a lot of scientific illustration as well as illustrating just in my spare time for fun.
Lara Noren:
Awesome, very cool. So just to get us started right off the bat, we already have a question, and this one goes out to Kate. What is the difference between fish and fishes? Which one should I be using?
Kate Bemis:
Yeah, that's a great question. So both are correct in different circumstances. So we use fish to describe a single individual or a single group of individuals that are the same species, and we use fishes when we're talking about multiple species. And so if you had a goldfish and a cichlid in your tank at home, you would have fishes, but if you just had goldfish, but you had 10 of them, you would call them fish.
Lara Noren:
Interesting.
Kate Bemis:
Did that makes sense? It's kind of complicated, but it's a really important distinction that we try to make.
Lara Noren:
Yeah, that is important. Well, very cool. So now that we have that out of the way, I would love to know how do you two know each other? Have you worked together in the past?
Kate Bemis:
Yeah, so as a scientist I think it's really important to use art to communicate to others, because you can really quickly and effectively show another scientist or anyone who is interested in what you're doing what you're talking about, and so it's been really fun to collaborate with Rachel. We've been friends for a few years and now we're collaborating on a few projects together because, well, it's just really fun to work with a scientific illustrator who can highlight the things that are really important for us to communicate.
Rachel Keeffe:
Yeah, I love working with Kate since she has such a wide knowledge of lots of different fish groups. So if I'm illustrating something, and I have a question about, "What color is this fish when it's in the water," or, "How many teeth does it have," she knows right off the bat. It's really great to work with her.
Lara Noren:
Very cool. And, Rachel, can you briefly tell us what is a scientific illustrator? What does that mean?
Rachel Keeffe:
That's a great question. So a lot of times it's mostly that you're making art for the purpose of explaining a scientific concept or to illustrate a concept in a paper or book in a very clear way, but really it is illustrating and in a lot of cases you do use your artistic license even when you're drawing formally for a paper.
Lara Noren:
Okay, very cool. So it's drawing then. It's drawing animals and using those drawings to understand science.
Rachel Keeffe:
Exactly.
Lara Noren:
Very cool. So explorers, I just want to make a note, we are really sorry for the inconvenience, but our captions are not working today, unfortunately, but don't worry, we will be sure to have closed captions on the archive of this video, which is going to be posted on the Natural History Museum's website, and our captions should be fixed for the rest of the week's program, but again, I apologize for that inconvenience. So explorers, I have a question for all of you, and you can type this into the Q and A, and in my opinion, it seems like it would be a lot easier to take a photo than to draw an entire specimen, or a fish, or a jellyfish, or an octopus. That just sounds like way harder, but clearly people are still doing it. So there must be some benefits.
Explorers, why do you think it might be beneficial to use an illustration instead of a photograph? And we have some people who are writing in right now. Because you can see details, there's more details, because you don't have to go to the bottom of the ocean. I like that one.
Kate Bemis:
Yeah, these are all great
Lara Noren:
Because the drawing might have more detail or different detail than a picture. I totally can see that logic. So you can highlight details. What do you guys think of these responses?
Kate Bemis:
Yeah, so I think our explorers are right on track that an illustration can sometimes really highlight the details that we are trying to communicate. And I think, Rachel, you want to talk about some of the other differences?
Rachel Keeffe:
Yeah. So there's actually quite a few, and especially with fishes. Sometimes if you're trying to draw, you know, want to illustrate this fish, so that other people know exactly what kind of fish it is. If they find another one, can they tell if it's the same? And a lot of times when you bring fish, especially deep sea fishes back up to the surface from deep underwater, they end up getting a little bit distorted. Sometimes they can get kind of blown up or they can lose ... You have fins that are broken, and an illustration allows you to make the perfect image of what this fish is, or what it could look like when it was underwater.
So I could ask Kate, "Oh, Kate, this fish has a broken dorsal fin. How many fin rays is it supposed to have?" And then I can draw in what that would look like however I want, or I could draw it from a different angle, or I could use different colors. So there's a lot of different ways that having a illustration is actually better in some cases than a photograph.
Lara Noren:
Oh, very cool.
Kate Bemis:
Today we're going to be focused on scientific illustrations and trying to capture the fish in an illustration, but really every time scientists are making decisions about trying to what's going to be best. In some cases, photographs do a better job, because you can capture that the color really accurately, but other times we just want to focus on some of the key features, which is what we're going to be doing today with our illustrations.
Lara Noren:
Very cool, and I want to point out, Rachel and Kate, a lot of our explorers used those exact reasons why we would want to use an illustration, so well done all of these explorers. You all are so smart. I'm so proud. And also a lot of our explorers said, "Because it's fun."
Rachel Keeffe:
Oh, for sure.
Kate Bemis:
Rachel will definitely be talking about that, because she loves to draw.
Lara Noren:
Perfect. Well, now that I am so excited to learn more about illustration, let's get started with talking about what are we going to be illustrating today? What are we going to be drawing?
Kate Bemis:
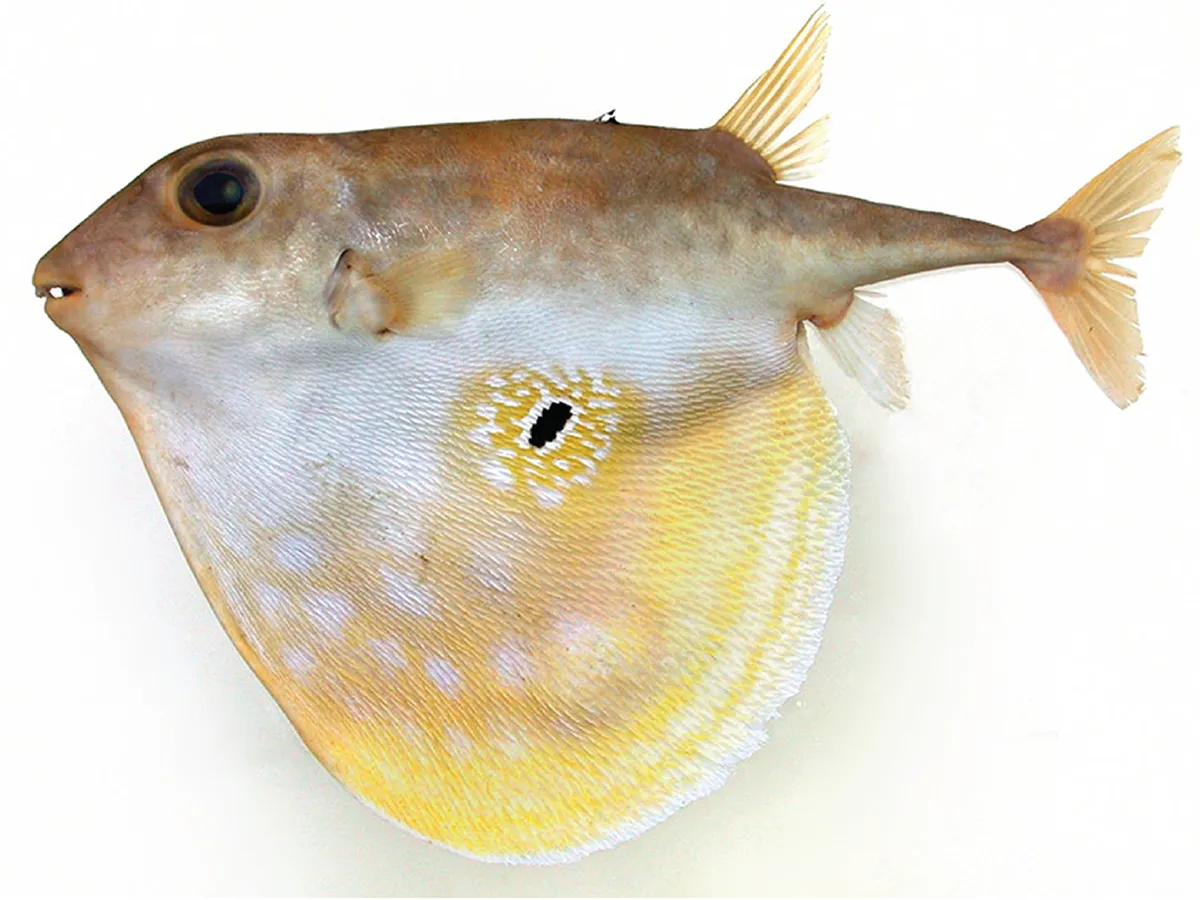
So today we're going to be drawing one of my favorite deep sea fishes called the three-tooth puffer and you can see on the screen there this is an individual, and we also call this fish Triodon macropterus. So today what we're going to do is we're first going to talk a little bit about the fish, and then Rachel is going to guide you through steps of how to do your own scientific illustration of this species, starting with making some observations, and then we we'll fold some paper to make a grid system in order to get the proportions right by outlining our fish first and then drawing it.
Lara Noren:
Awesome. Well, I am so excited. So Kate, can you tell me a little bit about this fish? It is very interesting looking. Where does this animal live?
Kate Bemis:
Sure, yeah. So the three-tooth puffer lives about 100 to 400 meters, or one to four football fields, beneath the surface of the ocean, and it has some really interesting adaptations we're going to talk about. So one thing you can see in this picture that's on the screen now is that this fish is very elongate in this image, and that its body depth, the distance this way, is not that deep, but one of the really cool adaptations we're going to talk about today, you can see on the next slide there is this structure called the dewlap, and if you move one more slide forward, you'll see the extent of that dewlap.
And so what this dewlap is it's a really large flap of skin that the three-tooth puffer can expand out from its body. You can see the picture in the bottom is it with it not expanded, and then the blue dewlap you can see is fully expanded in that image.
Lara Noren:
Wow, that is so cool, and what a interesting thing for this fish to do.
Kate Bemis:
Yeah, yeah, it's really cool. So I'm interested what our explorers think the dewlap might be used for.
Lara Noren:
Yeah. So explorers, write into the Q and A what do you think this fish uses that dewlap for? And I'll just share with you, Kate and Rachel, some comments we've been getting about this fish. Some people are saying, "It's so cute." Some people are asking, "Does it have three teeth? Is that why it's called a three-tooth puffer?"
Kate Bemis:
Yeah. So yes, it is definitely so cute, and it does have three teeth, so Triodon means three-tooth, and this group of fishes, the tetraodontoids, have varying numbers of teeth in their jaw, but they all have teeth that look like a beak. So in the top jaw of this fish, they have a beak that's composed of two separate pieces, so that's two, and then on the bottom, their beak is just ... I don't know exactly how to show. It's just one. And so those are the three teeth that the name is talking about.
Lara Noren:
Okay, very cool. Well, we have been getting a lot of responses to that question. A lot of people are saying to puff up, to look bigger, flapping, so that maybe it can steer, scaring predators maybe, maybe to get a mate. Does it store things in the dewlap? Is it kind of like a kangaroo pouch situation?
Kate Bemis:
Yeah, so these are all great questions and thoughts about what the three-tooth buffer might use its dewlap for, and scientists think that this is primarily an adaptation for increasing their body size really dramatically, and someone said anti-predator. That's exactly what we think the dewlap is for. It's an anti-predation mechanism in order to discourage predators from feeding on them.
Rachel Keeffe:
So Kate, I have to ask, what is with the giant black dot on the dewlap?
Kate Bemis:
Yeah. So Rachel, you're talking about ... And if you move forward one slide, you can see it highlighted there. That's what you're talking about, right?
Rachel Keeffe:
Yep.
Kate Bemis:
Yeah, so that's called an eyespot or an ocellus, and we think this is also related to their deterring predators. So you can imagine that when that three-tooth puffer has its dewlap retracted and not out, that spot is smaller. You can see it in the bottom picture there, but then when they expand this dewlap, that eyespot comes out, and in other fishes we know that the eyespots are used to confuse predators, so this is further suggestion that this is an anti-predator device.
Lara Noren:
Oh, okay. Wow, that is really interesting.
Rachel Keeffe:
I'd be scared if I saw that all of a sudden, I think.
Lara Noren:
So do you have any videos of this fish that you can show our explorers?
Kate Bemis:
Yeah, I would love to show a video. So this is a really cool video for a lot of reasons, but one of them is that this was relatively recently published in 2017. A group recorded this three-tooth puffer in its natural habitat, and until then, we had never seen this fish alive underwater. And so what you'll see in the video ... We can watch it again if you missed it, but there is at first when the three-tooth puffer notices that there's something nearby, and in this case, that's the remotely operated vehicle that's underwater recording the footage, you'll see that it's more in the elongate shape at the beginning of the video. I'll wait till you get back there. Yeah, it looks like more it's not a large animal at all, but then in response to the ROV, the remotely operated vehicle, it expands that dewlap, and then you can see it getting bigger there, and then it swims off.
Lara Noren:
Wow. So Kate, are you telling us that this is the first and only video of this fish in existence?
Kate Bemis:
Pretty much, yeah. So this is the only video that I know about that shows the three-tooth puffer underwater in its natural habitat. So I think that's just so cool to me that this is the first time we're really getting to see it.
Lara Noren:
Wow. And we get to share it with so many of our friends, so that is awesome. Cool. So let's talk a little bit more about scientific illustration, and what do we need to know as step one in our drawing process?
Rachel Keeffe:
Yeah. So really the first part of any drawing is to really think about what you want to draw. Before you even put your pencil on the paper, think about what features you really want to highlight in your drawing, and this is especially important for scientific illustration because the point of the illustration is to send a very clear, easy-to-read message to your viewers. So in this case, there's a lot going on with this really cool fish. There's so many different things that you could draw, but we're just going to focus on the key features, some of which we already talked about.
So these would be things like the dewlap, right? Which is huge and really diagnostic of this puffer. We also talked about the eyespot, right? That's pretty important. The big cute eye, as well as the beak, and the general shape and position of the fins. So these are things that keep in your mind as things that these are the features that we want to put in our drawing, so that if someone else looked at your drawing, they'd be able to see, hey, that's a Triodon. That's a three-tooth puffer.
Lara Noren:
Wow, very cool. So Rachel, you said, "diagnostic," earlier. So does that mean that it helps scientists identify this organism, this species?
Rachel Keeffe:
Exactly. Yeah. I think Kate may have mentioned this, but a diagnostic feature is something that you use to diagnose a species as something specific rather than just general, "Oh, this is a fish." We want it to be diagnostic of this particular species.
Lara Noren:
Okay, that makes sense. So we really want to tell people, "We are drawing a three-tooth puffer. This is what it looks like. This is what makes this three-tooth puffer special."
Kate Bemis:
Yeah, exactly. And that's how scientists are able to communicate to other people, "This is how you know that this is the species we're talking about with diagnostic features and illustrations."
Lara Noren:
Wow, very cool. So let's take a closer look at this fish and make some more observations. Explorers, what do you notice? What are the diagnostic features that we are going to be drawing today? You can respond in the Q and A. And as we do that, Rachel, do you want to talk a little bit about step two?
Rachel Keeffe:
Sure. So there's actually a lot of different ways to construct a scientific illustration, and today we're just going to be focusing on one method of scientific illustration, which is called the grid method. And essentially what that does is you create a grid on top of a reference photo, which this fish that you see on the screen now, that's going to be our reference photo that we draw from, and a grid allows us to make sure that we draw the fish with the proportions that it really has in real life, which sometimes when you freehand something, which I do sometimes, but it's very easy to accidentally make the dewlap too big, or too small, or something is wrong with the proportions of the animal. But the grid allows us to make sure, okay, this is actually the correct dimensions of the fish, and it makes drawing easier by breaking it up into little easy-to-draw chunks rather than just drawing the fish from nothing.
Lara Noren:
Okay, that makes sense.
Kate Bemis:
And I think the other really cool thing about the grid method is that today we're going to draw the three-tooth puffer, but as long as you have a reference photo that you're excited about of any fish or really anything, you can use the grid method as long as the photograph is the same size as the paper you're going to draw on to use this method to draw anything you're excited about.
Lara Noren:
Okay, very cool. And a lot of our explorers are saying their diagnostic features that they want to highlight, so I think everybody is really excited.
Kate Bemis:
[inaudible 00:24:52].
Rachel Keeffe:
They're ready? That's great.
Lara Noren:
Yeah. A lot of people, of course, are saying, "Dewlap," which is D-E-W-L-A-P.
Kate Bemis:
[inaudible 00:25:00].
Lara Noren:
And a lot of people are noticing eyes, noticing those white spots. So awesome job, explorers, you are all noticing these really special features, body parts, diagnostic characteristics, and we learned some new sciencey words, so that's also pretty [inaudible 00:25:20].
Rachel Keeffe:
Dewlap is a very funny word.
Lara Noren:
All right, so let's set up our lines now.
Rachel Keeffe:
Perfect. Yeah, so today we're going to be using 16 squares in our grid. Of course, if you do this by yourself, you can use as many or as few as you want, but 16 is pretty easy, especially for this fish. The squarer your animal is, the easier this method is, but you can see here that we're going to be with our paper, we're going to be replicating these squares, and then we're going to be drawing each of them one at a time. So let's get started.
Lara Noren:
Perfect.
Rachel Keeffe:
Yeah. So the way that we're going to do that, and again, there are different ways to do this, but I think the easiest way is to fold your paper, and we're going to have a little video for each of these steps, so that you all can follow along. And just so you know, they might go a little bit more quickly than you fold, but don't fear. We're going to be posting all of this afterwards, so that you can go at your own pace if you ever feel like you're falling behind, so don't worry. But the first thing we're going to do, and let's start the video here, we're going to be folding the paper in half, and I call this the hotdog way, because it makes the paper kind of thin like a hot dog, and you're going to kind of line up the edges, and this works best on a flat surface, and kind of just use your other hand to press the crease into the paper, so that you make it exactly in half.
And they don't have to be exactly. If it's off by a little bit, don't worry. It's going to be fine, but then we are going to make a second fold in the same hot dog direction. So you have a super thin hot dog, and they're going to make the crease again, and the crease doesn't have to be super hard. It just has to be enough where you can see it when you open the paper up again. So here I am opening the paper up, so you can see that actually right now, if you look at the folds, there are four very long rectangles that we've made, and I do this for me. You don't have to do it, but I take a pencil, and I lightly trace over the creases, so that it will be easier to see the edges of our boxes later on, but that step is optional.
So then I flatten the paper, and then we're going to make a fold, which I call a hamburger fold, where you make the paper squatter, and you're going to do the same thing as last time, just align the edges, and crease the bottom, so that you now have another fold, folding the paper in half, and then we're going to fold it once more in the hotdog ... I mean the hamburger way, and you're going to make your final fourth fold. And these folds together will make your grid on your piece of paper in the same dimensions as our reference photo. And again, I kind of just open it up gently, and I take my pencil, and I draw in over the top of the creases we just made. And if you did this correctly, then you'll have 16 squares to work with once you're done. I draw very lightly, because in the end you can always erase these grid lines, so then it will just be the fish at the end, but you can do it however you please.
Lara Noren:
Okay, very cool. And for this piece of paper, we're just using a standard printer paper, eight-and-a-half by 11, but if you have a square piece of paper that you want to use, that is okay, and the folds will probably work out as well, but for this one, we're just all using this printer paper
Rachel Keeffe:
And even if it's off by a little bit, it's going to be pretty close, so don't worry about it.
Lara Noren:
All right, explorers, if you want to type into the Q and A, are you done with your folds, and let us know. All right. We still have some explorers who are folding, a couple people.
Kate Bemis:
So maybe while they're folding, I can tell you a little bit about the three-tooth puffer, some of the other ways we've been studying it recently.
Lara Noren:
Yeah, that would be great.
Kate Bemis:
Yeah, so one of the really cool things that's happened in the last few years is that an aquarium in Japan has been able to keep some three-tooth puffers alive. So it's totally different than when you just see a specimen, because you can see these three-tooth puffers moving around in the tank. And one of the most interesting observations they've made is that almost all the time the puffer is in the elongate shape and doesn't have the dewlap expanded. So we're still learning a lot about these three-tooth puffers, especially because they're now being kept in aquariums.
Lara Noren:
That's awesome. That is really cool that they are able to keep one in an aquarium even though it lives in such a deep part of the ocean.
Kate Bemis:
Yeah, and it's a special aquarium that really focuses on displaying deep sea animals, so it's really cool.
Lara Noren:
Wow. Awesome. All right, so we are going to move on to the next step. Most people are done folding. If you're not, again, no worries, no stress. We will be posting this video after.
Rachel Keeffe:
Drawing fish should always be relaxing, so try to have fun and just go at your own pace. Yeah, this is the next step here is step number four, so this step is going to involve drawing intersection points of the fish on the grid.
Lara Noren:
And so the grid, once we're done with that, it's just going to look like 16 light squares on your piece of paper.
Rachel Keeffe:
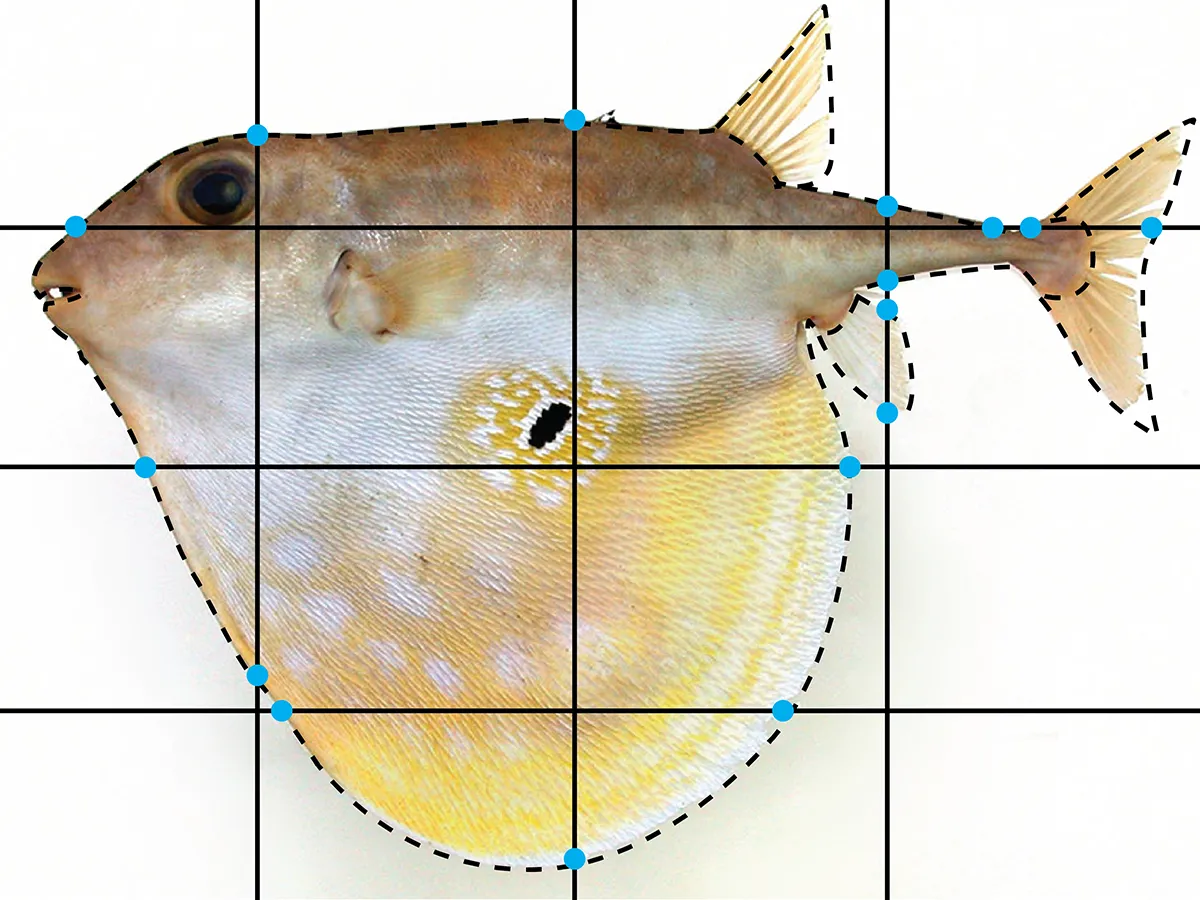
Exactly. And you can see here on the reference photo to the left that I've actually drawn in with blue circles the intersection points that we're actually going to be drawing, and in this step we're just going to be focusing on the edge of the fish. So this is where the fish comes in contact with the white background, and also where it comes in contact with the black lines of the grid that we made. So you can see-
Lara Noren:
Okay, so these blue dots?
Rachel Keeffe:
Exactly. And to make it easier, we numbered the grid boxes, so that you can follow along with what I'm describing. So if we looked, for example, in box number one, there are two intersection points actually with the edges of that first box. The first one right above his beak there kind of occurs on that leg of the grid, kind of a little bit more than halfway along those two, like the intersection point between boxes one and five. Perfect. Yeah, right there, and then the other intersection point occurs between boxes one and two, just I'd say probably a third of the way up that line there, kind of right above his eyebrow, if fishes have eyebrows. So we're just going to be drawing. You can either use a dot or a line to indicate this point, but these intersection points are going to be what we use as a scaffold or a guide when we eventually draw in the lines of the edge of the fish.
So Lara, you can go ahead and start the video, but again, I just want to remind everyone, take your time. This is go at your own pace. I might go a little bit quickly, but again, this will all be available afterwards. So I draw in first the intersection points that we just talked about for right above the beak and right above the eyebrow. There's another intersection point on the back of the fish between boxes two and three that's almost halfway up, so it's a little bit higher than the eyebrow intersection point. There's also an intersection point, there's a number of them in box number four for the tail, which might be a little bit hard to draw, but the first one is just a little bit up above that line between three and four, and then there's a couple others that almost get to the end of the paper for the back of the tail fin.
And again, just put these in, kind of eyeball them. Again, you can erase these later if you feel like, "Oh, I didn't get that one just right." It's okay. These are just going to be your guide, and what I always find interesting about this fish in particular is that that dewlap is way bigger than I think it is. That dewlap, if you look way down at the bottom, the intersection point at the bottom of the dewlap almost touches the bottom of your paper, which is enormous.
Lara Noren:
That is a huge dewlap.
Rachel Keeffe:
Yes, it's huge, and really the grid is great because it forces you to draw all the way down to the bottom, because I don't think if I was just closing my eyes and doing a drawing from memory, I don't think I would get it that big.
Lara Noren:
Yeah.
Rachel Keeffe:
Yeah, right there you see that I've done the ... And again, these are just on the edge of the fish, but these are intersection points that we're going to be working with.
Lara Noren:
Wow, very cool. So Kate and Rachel, can we all turn off our video so the audience can see it full screen?
Rachel Keeffe:
Sure.
Lara Noren:
Awesome. So let's move on to step five now.
Rachel Keeffe:
Great. Yeah, so step five is pretty fun. So what you've essentially done here is you've created the beginning of a connect the dots exercise or a a connect the dots puzzle. So what we want to do is we want to draw. You can see on the reference photo we've put there are dotted lines now, and that's going to be what we're going to draw for this step. So we're going to be connecting the dots that we just made along the edge of the fish. So you can see, for example, let's start in box one there and just take a look.
There's a gentle slope kind of that is right in front of the fish's eye, and then makes up the top of his eyebrow between the two dots, the intersection points that we made. So we're going to be drawing with our pencils along that gentle slope there and connecting all the dots that we made. So Lara, you can start the video if you want and just follow along with the lines that I'm making, but you're going to be drawing the slope for that first box, and you can see that I kind of draw many soft lines before I draw in a more dark line, and that's a tool of sketching is draw kind of gently, and then once you get more confident, draw in a little harder. The box number two is pretty simple, because his back is very straight.
So it's almost like a perfectly straight line between those two intersection points, and I will say box number three is a little difficult, right? Because there's a huge fin in the middle of it, and you can kind of get around this by coming in from the right and the left, and you can ignore the fin at first and just draw kind of where the edge of his body is, which is a little steep slope in the middle of that box. And then what I do ... And again, we're going to come back and go over these lines again, so it's okay if they're not perfect, but I put in very lightly just a small triangle for that dorsal fin there or his back fin that we're going to go over in more detail later, but I just draw it in, and I can see that that fin almost goes to the tippy-top of the paper.
So just use your freehand skills to put those in there. And often if you kind of think about these fins as just general shapes, it kind of makes them easier to draw. For example, the tail there, the tail fin is it almost looks like a half moon. So if you draw in the tail fin, just thinking about this tail kind of looks like a crescent moon then it's easier to draw.
Lara Noren:
Okay, that's very cool.
Kate Bemis:
We actually have a word to describe the shape of that tail fin, the caudal fin. We call this shape lunate, and this often suggests that fishes with these shaped tails move very quickly through the water. So it's really interesting, because one thing you'll notice as you're drawing is you make these observations about the fishes, and a lot of those observations actually tell us about how this fish makes its living. So like you saw in that video, you probably can predict that this three-tooth puffer is a pretty fast swimmer based on the shape of its tail fin.
Lara Noren:
Wow, that is so cool, and I think really brings up an interesting idea that because of doing these drawings, we really understand how these animals move, and how they live their life, which is pretty cool.
Kate Bemis:
Yeah.
Rachel Keeffe:
They are pretty fast.
Kate Bemis:
Yeah, I think a lot of scientific illustration is about making those observations, which you make before you even start, and then you also make a lot as you're trying to get your illustration to accurately replicate what the fish actually looks like.
Lara Noren:
Yeah, that totally makes sense.
Rachel Keeffe:
Yeah. And, Kate, you say sometimes you like to draw the fish too to get an idea of the features, because when you draw you're kind of forced to look more closely at an animal than you would if you were just looking at it, right?
Kate Bemis:
Yeah, absolutely. It's definitely it's a really good exercise. Even if I'm not planning on publishing, like producing a scientific work using my own illustration, it still helps me to do the drawing because I learn a lot about the fish in the process.
Lara Noren:
Wow.
Rachel Keeffe:
Also, it's fun to draw too, just [inaudible 00:38:44].
Kate Bemis:
Also fun.
Rachel Keeffe:
Great.
Lara Noren:
So Explorers, I'm curious, how are you doing? You can write in the Q and A if you are done connecting your dots, or if you are still working on that step. Also, Rachel, I have a question for you. Some of our explorers have said they have made a couple of mistakes along the way. Is that okay?
Rachel Keeffe:
Oh, that's totally okay. I make mistakes all the time. And what you can do is, of course, you can go back and look at the video later because it's just going to be online, but if you notice that you make a mistake, just go ahead and either erase, or if you're with pen, sometimes you can see the pen on the other side of the paper, and you can kind of trace over your lines, but just go ahead and erase those points, and just redraw them in, and we're going to be making some other steps in the next couple steps that will kind of finalize things, so don't worry at all. That's okay. And also I just want to mention that a lot of fishes, especially within the same species, can look a lot different from each other. So even if it doesn't look exactly like this fish, if you're off by a little bit, then don't worry, because fish in real life can be pretty different themselves.
Lara Noren:
Yeah, that makes sense. Also, explorers, I want to point out that we have resolved our closed captioning issue. So if you would closed captioning, meaning if you would like the words we are saying to appear on your screen, you can click on the CC button at the bottom of your screen to turn them on, and again, we apologize for this delay, and if you would like that feature, it is available now. So I have one more question I think before we move on to our next step. So this is a really interesting question. Where do we find these fish? I know before, Kate, you mentioned that there's an aquarium in Japan that has live fish. Are they only in water around Japan?
Kate Bemis:
Yeah, that's a great question. So the three-tooth puffer is only found in the Indo-Pacific oceans, so we don't have it here. I live near New York, and so we don't have it in the Atlantic Ocean, which is right nearby, and actually most of the specimens that have ever been collected of the three-tooth puffer come from around Japan, also Taiwan, Australia, Indonesia. So it is restricted in its range to the Indo-Pacific.
Lara Noren:
Okay, cool. Well, that is really interesting.
Kate Bemis:
Yeah, that's a great question.
Lara Noren:
So let's move on then to step six.
Rachel Keeffe:
Great. And again, I just want to reiterate, don't worry if you're falling a little behind. It's okay. Everything is going to be on later, and it's great. Even if you just kind of make a rough pass at it first, you can always go over it again later, but what we're going to do for this step is ... And again, this is kind of optional, but I use it personally because it helps me out, but the idea is the more squares that you have in your reference photo and the more that you have in your grid system, the easier it is to draw the features you want, because it kind of improves the resolution, or it makes it easier to see where the features are on the page. So what I do is I make what's called a mini grid, and I'm just doing this ahead of time, because I know that in the next couple steps you're going to be drawing in delicate features like the fins.
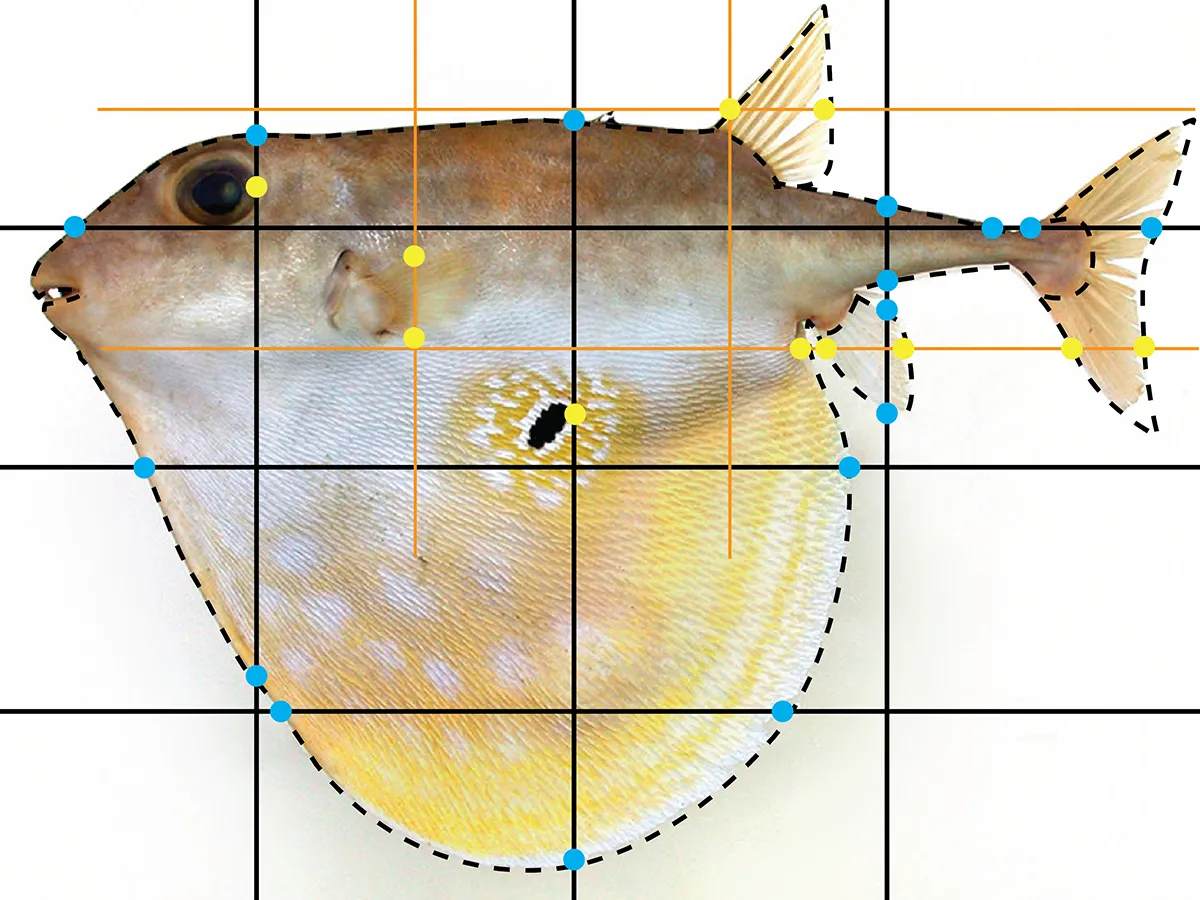
So you can see here on the reference photo that I've put in some orange lines that are very light, and I don't even fold the paper for these. You can already see from your 16 boxes that you can kind of freehand a line that divides those boxes 2, 3, 6, and 7 in half. And again, you don't have to do this, but I find it's easier to put in some of these mini-grids, so that it's easier to see kind of where certain features are. So Lara, you can start the video, and it just kind of shows me lightly with the pencil just drawing in little halfway marks, so basically dividing each of those squares into four smaller squares, so that later on we can draw the fins in accurately.
Lara Noren:
Okay, very cool. So should I start the video?
Rachel Keeffe:
Oh, go ahead. Yes, please. And you can kind of see in the next couple steps, we're going to be drawing intersection points on the mini grid with the yellow dots that I added. So you can kind of see the reason for doing this is so that we can see where certain fins cross this mini grid, and it makes it easier for us to draw them in later, but you could do this for the whole paper and just make twice as many squares, but I find that the areas that I put the orange lines are kind of the hard areas, because you can see that there are a lot of fins.
Kate Bemis:
The fins are pretty hard to draw.
Rachel Keeffe:
Yeah, I know. Sometimes I struggle with the fins, and really just breaking it down into simple shapes is kind of, I find, the way to go.
Kate Bemis:
Yeah, it's hard.
Lara Noren:
Awesome. Well, let's move on then to step seven. Let's add some details.
Rachel Keeffe:
Yeah. So I love this part because this kind of gives your fish some personality. So each fish is going to look a little different, and I think that's awesome, but we're going to draw in the features we mentioned before, right? So up until this point, we've only been focused to the edge of the fish, but now we've got to draw those cool parts like the eye, and the eyespot, and all that. So I'm going to start. Lara, you can start the video. I'm going to start drawing here the eyespot, and you can see that the end of the eyespot, it's the eyespot occurs within box six, and it just barely touches the line between boxes six and seven. And it's actually not a circle. It's actually an oval, and you can see based on the mini-grid that it's completely inside of the bottom right, tiny, mini square in box six, so you know not to make it bigger than that.
And then I go ahead, I'm kind of drawing the easiest features first. I then go, and I draw in the eyeball, which in this fish is always way bigger than I think it is. If you see on the boxes there, the back of the eye intersects with the line and the grid system between boxes one and two, and it's completely inside box one, so it doesn't go into boxes two or five at all, but it does almost go up to the top of the eyebrow, or whatever that is, and you can kind of make it look extra cute. a little art trick is to make the pupil look kind of like a crescent moon, so it kind of makes it look shiny, and I mean, making your fish look cute is always a fun thing to do.
Lara Noren:
Yeah, that eye is huge, and that is a characteristic that we learned about earlier this week, that a lot of deep sea animals have these huge eyes. So it's awesome that our three-tooth puffer is able to have that quality as well.
Rachel Keeffe:
That's so cool. Yeah, well, if you look at a lot of those deep sea fish, they have massive eyeballs. Yeah, and then, again, some of these features that we mentioned before are the shape of the fins and the gill opening, which the fin that I'm drawing right now is actually the pectoral fin, or if fishes had arms, this would be what the fish's arm would be, right? This fin here, and you can see that, again, if you drew the mini-grid, that it intersects with part of the mini-gridded box six twice, and it's hard to see in the photo, but the tip of the fin just touches the line between boxes two and six, and again, that fin is a little bit odd in shape, but if you just draw in a triangle, you're going to get it pretty close. And again, fish fins are very mobile and squishy, so if it's not the exact shape, don't worry. It's going to be pretty close.
Lara Noren:
And by mobile you mean they move around a lot, right?
Rachel Keeffe:
Oh, exactly. Yeah. So if you've ever seen a fish in a tank, you can watch their fins move when they dart around, and they're pretty flexible and cool. And then I also want to just mention, because it's hard for me to notice too, but this fish has a very weird gill opening. It almost looks like a little dimple right in front of that pectoral fin.
Lara Noren:
Oh, yeah. I see that right there.
Rachel Keeffe:
But that is actually the gill opening, and that allows the fish to breathe, so it's important to put in there,
Lara Noren:
Yeah, I want my fish to breathe. Yeah.
Rachel Keeffe:
Yeah. And the rest of the fins, you can see me just kind of going in and adding some detail to the fins that we sketched out in previous steps, and I kind of just darkened the lines there. And if you look closely at the reference photo, you can see that inside of each fin is a couple ... There's darker lines, and those are fin rays which support the structure of the fin, and in a scientific illustration that I would put in a paper, I would make sure that that's the right number by talking to Kate, but just for this exercise, go ahead and just draw some straight lines in the middle of the fins to give them the impression that there's fin rays in there.
Lara Noren:
Wow, very cool. So Rachel, we've gotten a couple questions now about how do we add even more detail beyond these super-cool features. So for example, a lot of people are mentioning those little white spots and those lines towards the end of the dewlap. How would you go about adding those extra details?
Rachel Keeffe:
Wow, I'm so happy to hear people are really into it. I know this method is really adaptable. This is kind of I'm just showing you the very beginnings of how to draw a fish with the grid method, but of course you can make it your own and use as much detail as possible. And the way that I would do that is you could add even more mini-grids, so kind of if you continue to increase the number of squares on your paper, you'll be able to. If you wanted to draw in the beautiful markings on the dewlap, then having more grids down there would make it easier. I think we're going to mention at the end that, of course, you don't have to, but you could color with colored pencils this drawing and use the idea of the grid to do your color pencil, since you'd be able to kind of see where those bands of yellow cross. Oh, there it is. Perfect. You can see I couldn't help myself from coloring it in. Not-
Lara Noren:
That is so beautiful, Rachel. I love that.
Kate Bemis:
I love it. It's so nice.
Rachel Keeffe:
Thank you. Yeah, sometimes I get carried away. Not all scientific illustrations have color, but sometimes it's fun just to color just for fun, but you can see for this drawing I used mostly three colors. I used yellow colored pencil. I used black colored pencil, brown, and orange.
Lara Noren:
Wow.
Rachel Keeffe:
And I kind of freehanded this a little bit, but of course if you look at the grid while you're coloring, you'll be able to see kind of where the darker parts of yellow start and end. So really the grid is up to you how detailed you want to get. You just add more squares and look at your reference photo, and you can even print off the reference photo and draw in more lines if you want to, but really the sky is the limit. You could even probably have thousands of squares, but that would take a long time.
Lara Noren:
Yeah, very true. So we are almost out of time. I have been having so much fun chatting with both of you, but I really want to ask this one question that we got, and this one is for Kate, "So are these animals endangered, and also can you just speak to how rare they are?"
Kate Bemis:
Yeah, definitely. Yeah, so that's a great question, and one of the things that's so exciting to me is even 50 years ago there were only a handful of records of this fish, the three-tooth puffer. And I think part of that is we don't have a lot of information about how many there are out there, so it's hard to make an assessment of whether they are. They're not endangered, but it's hard to know what the size their population is because they live in the deep sea, but in the last ... And one of the things that influences how few specimens have been collected is that probably that they're really fast, and so they can avoid traditional collecting methods like using trawls or big nets underwater to catch them. And now in the last 20 years, there have been a lot more records of this species because people are catching them on hook and line. And so there's, I think part of this idea of how many there are out there is related to how challenging it is to observe them and collect them from the deep sea.
Lara Noren:
Wow, that is so interesting. So basically we need to know a lot more before we can answer that question.
Kate Bemis:
Basically, yeah. These are really rare. This is a really rare fish, and there's actually only about 100 records of them from specimens and museum collections, like the one at the National Museum of Natural History. We actually don't even have any at our museum, even though we have 6 million fishes there. So there's a lot that we still have to learn about this three-tooth puffer, and I'm just so excited that everyone is drawing it today, because now lots of people, even more people know about it.
Lara Noren:
Yeah, definitely. And do you both want to turn back on your videos, so we can say bye to everybody?
Rachel Keeffe:
This has been so much fun.
Lara Noren:
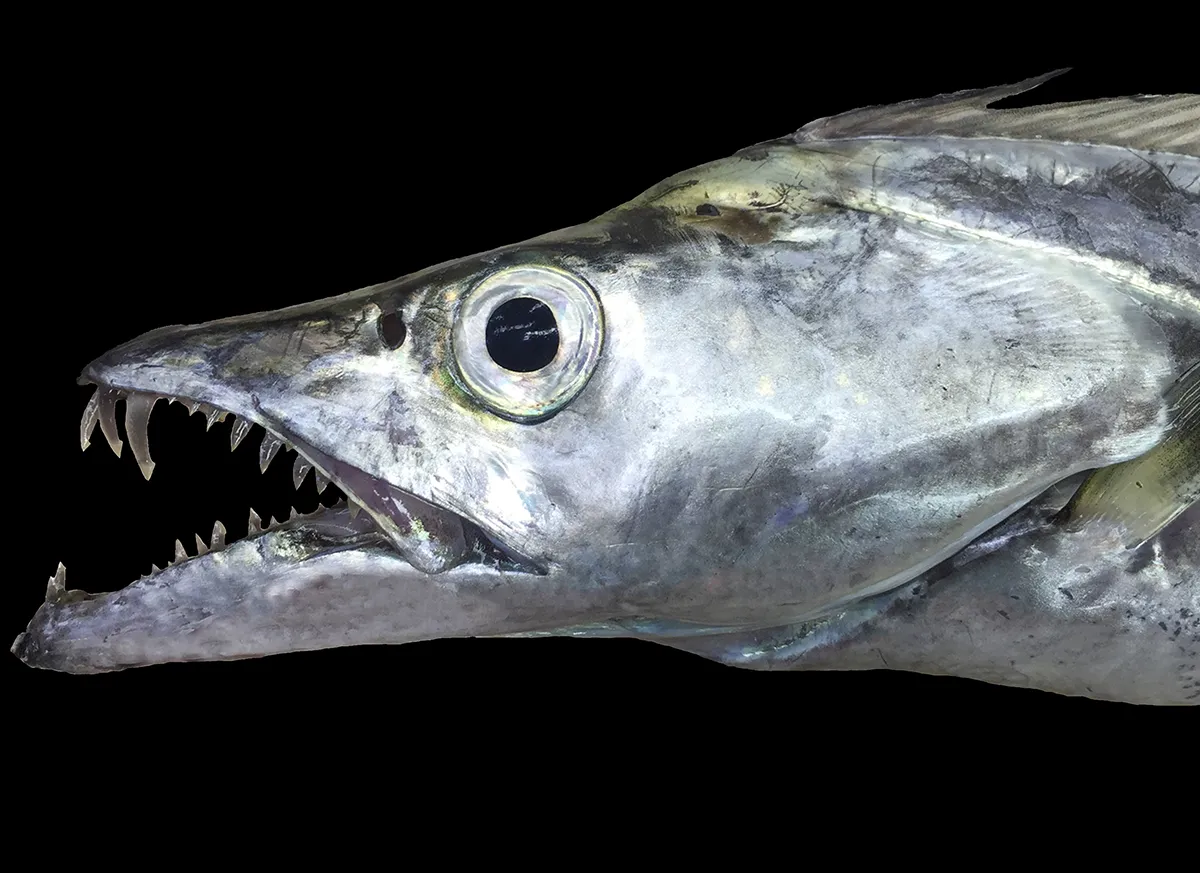
And we do have an extra challenge for our explorers out there. So we have done a little writeup of an activity that you can find on our website for an extra challenge. This one is a lot more stuff. There's a lot of stuff happening. There's a lot of teeth. So if you want to take this extra challenge, you can visit our website, and we are going to have it listed there.
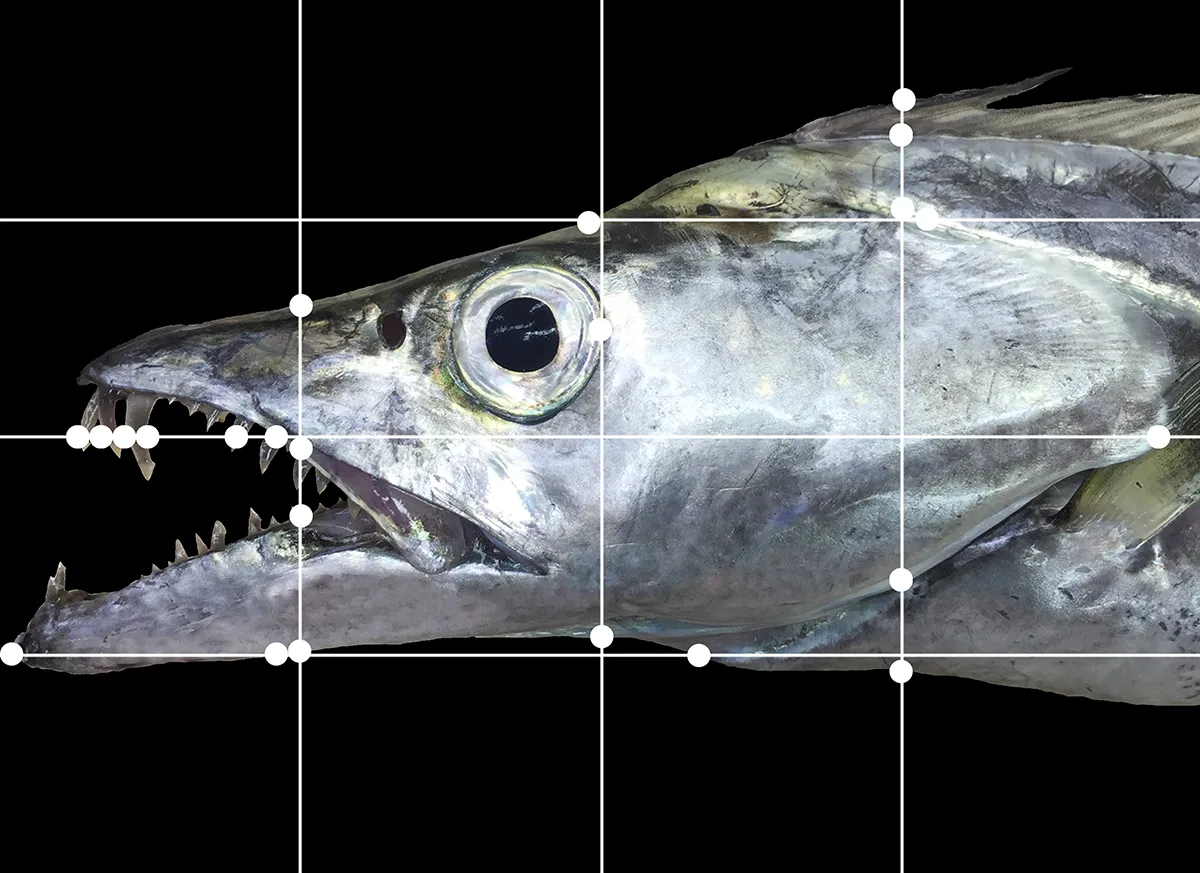
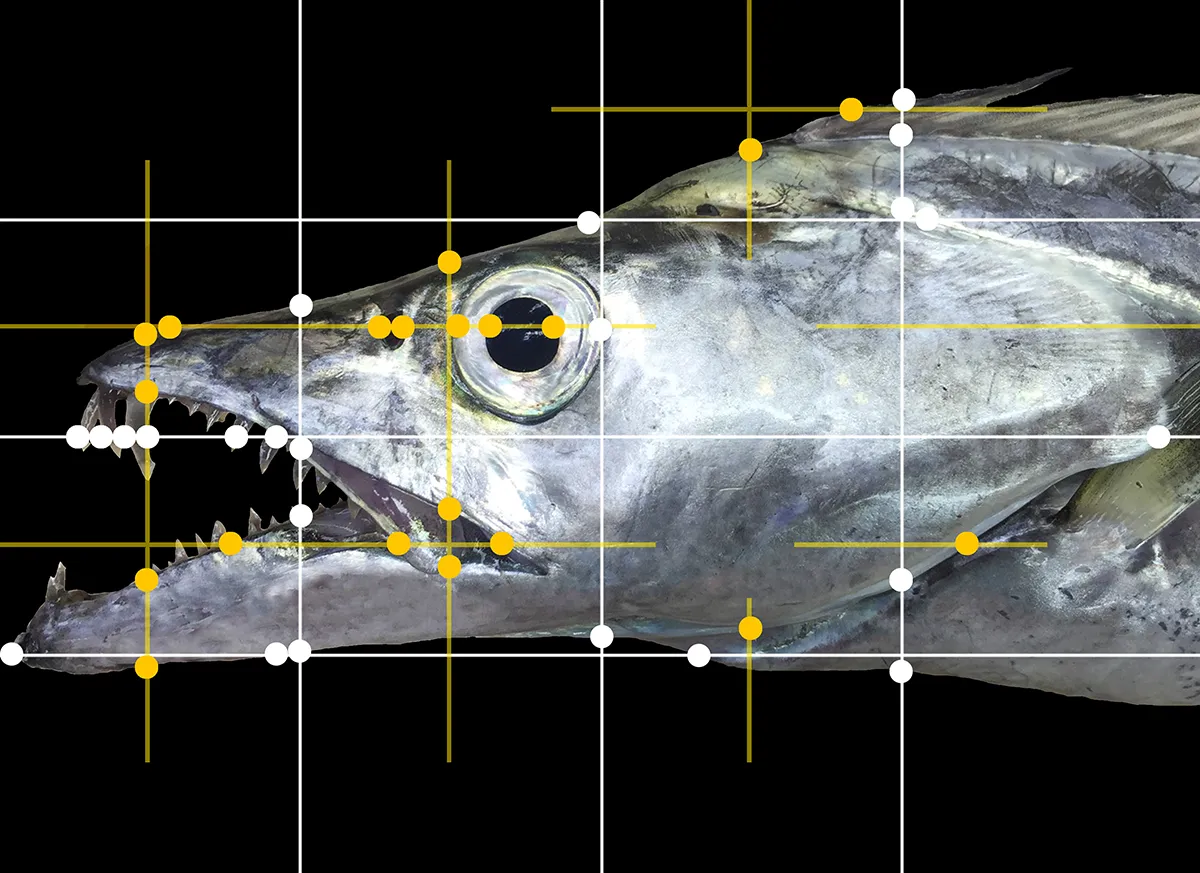
Kate Bemis:
Yeah. So this is the cutlass fish or the largehead hairtail, and on the right there, you can see a video of them taken underwater of them schooling in a large group, but Rachel set up the picture of just the head of this fish on the left there because that's a more square shape, so it'll fit your eight by 10 paper better. So we hope that you try this one at home too, if you had fun with the three-tooth puffer.
Lara Noren:
Yeah, most definitely. And some people have said that they are not done. That is totally fine. You all can spend the rest of the afternoon working on this if you would like to, adding color, adding details, and you can find all of that information on our website at Naturalhistory.com [sic., naturalhistory.si.edu]. So that is about all of the time that we have. So I am going to stop the screen share, and I am going to show you the website that we can use. And also you should see a poll popping up, and please let us know if you enjoyed the program today, and we are so excited because we are going to be doing another program tomorrow about worms and dancing, and I am so excited. So I really hope that all of you will join me again tomorrow as we learn even more about the deep sea and about these wonderful, amazing animals that call it their home. And I want to say thank you so much to Kate and Rachel, who have shared such interesting information with us, so thank you so much.
Kate Bemis:
Thanks so much for having us, Lara. This is so much fun to get to talk to you guys, and I can't wait to see the three-tooth puffer illustrations that folks send.
Rachel Keeffe:
Same here.
Lara Noren:
Yeah, me either. And for those of you who joined a little bit late, I wanted to share with you the video from the very beginning of the program, so everybody can see their jellyfish, if you all would like to stick around, and you can see it here, and you can submit these illustrations to our website or our email, and that's going to be at youthmnh@si.edu.
Kate Bemis:
The jellyfishes look so good.
Rachel Keeffe:
I love them.
Lara Noren:
All right, everybody, so goodbye, and see you tomorrow. I am so excited, and I hope that you enjoy the rest of your day, and I hope that you submit your illustrations. Thank you so much. Have a good day.