Search
Make Your Own Cave and Cave Art
This activity was originally created to supplement the family program, Camp Croods at the Smithsonian National Museum of Natural History.
Activity Description
Finding shelter or a safe place to live is one of the important basic needs of all living organisms. This includes ancient humans! Natural structures, such as caves or other covered structures made of rock, would have been some of the places that ancient humans might have found shelter. For this activity, you will build your own cave using household furniture items and create your own cave art inside your cave. Where will you create your cave art? Will it be on the wall of your cave, or maybe even the ceiling? Make sure to also make your cave large enough to shelter your entire family. Remember, like the Croods say, the pack stays together!
What You Need
- Homemade cave: Pillows, table, chairs, blanket, etc.
- Flashlight
- Paper bag, dark colored paper or recycled cardboard boxes
- Scissors
- Tape
- Paint, oil pastels, chalk, or crayons
Directions
1. Gather your supplies. For this activity, you will need furniture items to help create the shape of your fort (i.e., pillows, a table, chairs, blanket, etc.), a flashlight, a paper sack (i.e., from the grocery store) or dark colored paper, scissors, tape, and then one art medium: paint, oil pastels, chalk, or crayons. If you are using paint, you have the option of also using a small piece of a sponge or other textured material if you would like. However, using your hands to finger paint also works!
2. Build your cave. Before you build your cave, make sure you have found a space large enough that you can make a cave big enough to fit your whole family. You can also plan out your cave by choosing a place that uses furniture or other items that will be helpful in building your cave. Once you have chosen your cave location, use the rest of your supplies to build your cave.
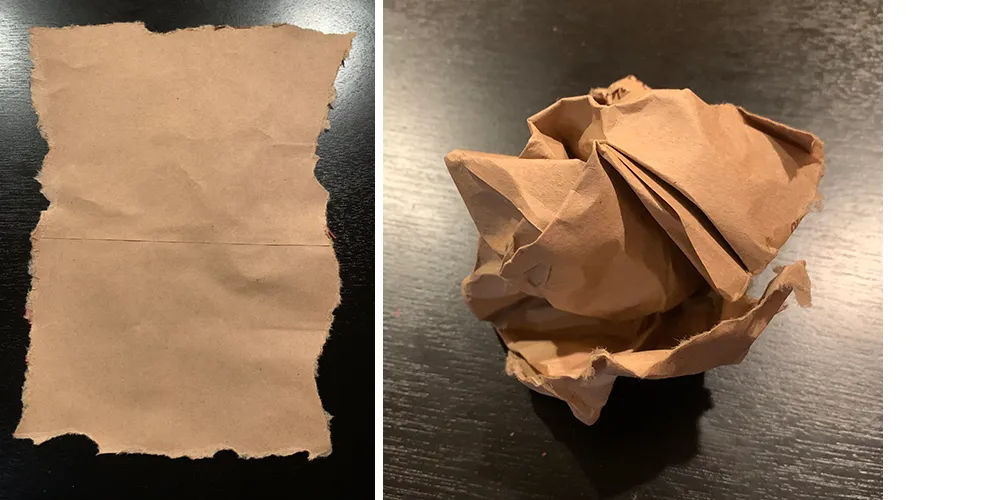
3. Prepare your “rock” paper. Once your cave has been built, prepare your rock paper to hang up inside your cave to create your cave art. Start by having at least one paper sack or dark colored paper cut to the size you would like. The larger your rock paper, the more of a place you will have to create your art. Next, tear all of the edges of your paper sack or dark colored paper. This will help to roughen the edges of your artwork and will help to give your paper texture. To add even more of an effect, crumple your rock paper up into a ball. Flatten out your rock paper. Another option is to use recycled cardboard boxes for your cave’s walls or ceiling.
4. Pick where you will create your cave art. Once your rock paper is ready, secure it to your surface inside your cave by taping it to a cave wall or ceiling. Prehistoric art was created directly onto the walls of caves and was not made someplace else and hung up for everyone to see. Make sure it is secure so it doesn’t fall! You might need to use a little more tape than you would on a flat or table surface.
5. Create your cave art. Using the rest of your art supplies, begin to create your cave artwork. Add color, shapes, people, animals, or symbols and designs. Grug and others in "The Croods" movies would use cave art to tell stories or record memories to share with their family. What story will your cave art tell? It might be dark inside your cave! Prehistoric art makers might have used fire to help them to be able to see their artwork. The flickering of the light might have even made some artwork look like it was moving! Make sure you have your flashlight handy to help you to be able to see your artwork.
6. Share your cave art with your family. Once your story and cave art is finished, gather your family for a story time inside the cave! Use your artwork and flashlight to make sure your family members can follow your story and see your artwork.
Take It a Step Further
- Decorate your cave with handprints, too! Follow the directions for the handprint activity to create handprints of your family for your cave.
- Invite other members of your family to create artwork and to tell other stories.
- Record your stories to share with other family members.
Explore More
- Look up close at another example of rock art! Explore a 3D model of the 40,000 - 60,000 year old Apollo 11 plaque found in a rock shelter in Namibia.
3D Apollo 11 Rock Shelter Plaque - Learn more about other types of shelters or behaviors of ancient humans.
- Join Dr. Briana Pobiner for a recorded virtual tour of the Hall of Human Origins!
- Want to explore the Hall of Human Origins on your own? Click the Time Portal to enter the exhibit and continue your exploration by dragging your cursor around and clicking on the arrows. Zoom in to make even closer observations.
- To learn more about ancient humans, the science behind how we learn about the lives of ancient humans, and about the Hall of Human Origins, you can visit this website: Human Origins: What Does It Mean to Be Human?
K-2,
3-5
Anthropology and Social Studies